When Is Compost Ready? 5 Tests That Actually Work
The pile looks done. Dark, crumbly, smells like a forest floor after rain. You mix it into your beds, transplant a flat of tomato seedlings, and two weeks later they stall. Leaves yellow from the base up. Roots barely push past the transplant plug.
The problem is phytotoxins. These compounds form naturally during active decomposition and suppress germination and root growth. Immature compost doesn’t look different from finished compost. It behaves differently once it’s in contact with roots. Knowing when compost is ready saves you from losing an entire planting window to a batch that needed two more weeks.
The fix is a set of quick field tests you can run before any compost goes in the ground. They work for any composting method, from a backyard pile to a worm bin to a tumbler on a patio.
5 Ways to Tell If Your Compost Is Ready
These five tests are listed from fastest to most definitive. The first three take less than a minute. The fourth requires a compost thermometer. The fifth takes 10 days but removes all guesswork.
1. Smell Test
Finished compost smells like damp earth or a forest floor. That’s the baseline. Ammonia means excess nitrogen and ongoing decomposition. Sulfur or rotten eggs means anaerobic conditions, usually from a pile that’s too wet or too compacted. Either smell means the batch is not ready.
2. Visual Test
The color should be dark brown to black. More telling than the color: you cannot identify any of the original inputs. No recognizable food scraps. No straw. No leaf fragments. If you can point at something and name what it used to be, the compost needs more time.
3. Texture Test
Pick up a handful and squeeze it. Finished compost is crumbly, holds together loosely when compressed, then breaks apart when you open your hand. If it clumps into a sticky ball, it’s too wet and still breaking down. If it crumbles into dry powder, it’s either over-dried or was never fully decomposed.
4. Temperature Test
Turn the pile and check the internal temperature 24 hours later. A finished pile stays cool. If the temperature spikes above 50 degrees C (120 degrees F) after turning, microbial activity is still high. The thermophilic phase is not over. This test matters most for hot piles and cold piles alike, though the starting temperature differs by method.
5. Germination Test
This is the definitive one. Fill a small container with a 50/50 mix of your compost and standard potting soil. Plant 10 radish seeds about half an inch deep. Keep moist. Wait 10 days.
Seven or more seeds germinated means the compost is ready. Fewer than seven means phytotoxins are still present at levels that suppress root growth. A 2009 review in Bioresource Technology (Bernal et al.) identified the germination index as the most reliable field test for compost maturity, ahead of C:N ratio or visual assessment alone. Woods End Laboratories developed the bioassay protocol that most field-level germination tests are based on.
📝 Editor’s note: In practice, most batches pass the smell and texture tests and go straight into the garden without issues. The germination test is worth doing once to calibrate what “ready” actually feels like in your hands. After that, most composters stop repeating it. It’s a learning tool more than a routine check.
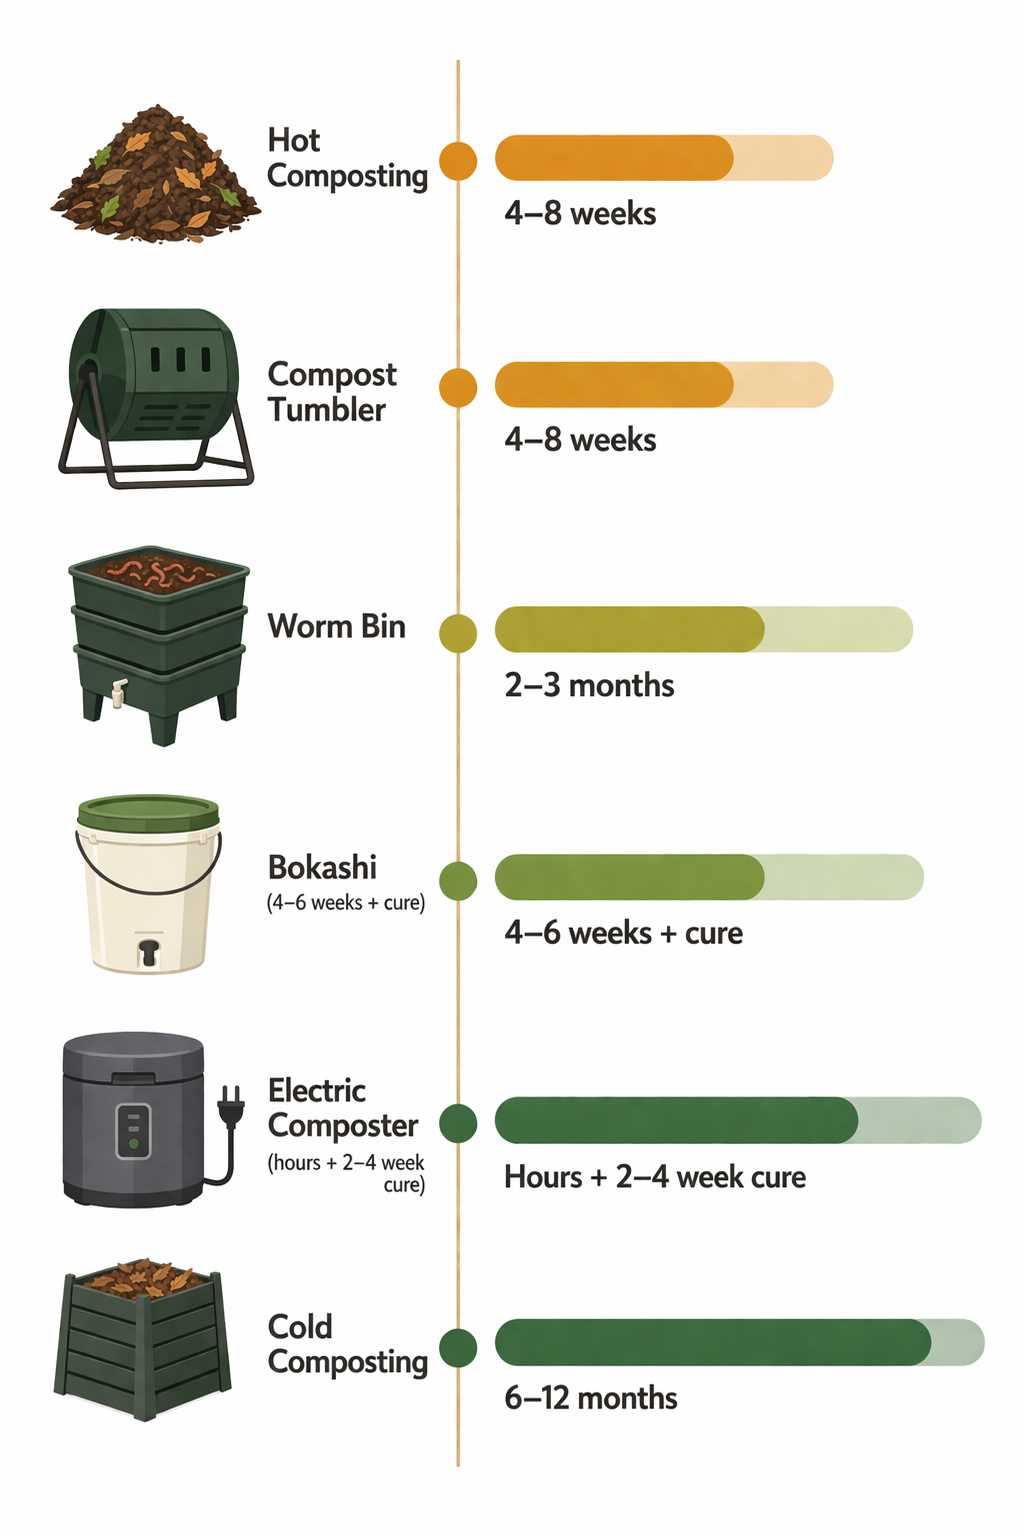
How Long Does Compost Take? It Depends on Your Method
The answer depends on your composting method, and the range is wider than most people expect.
| Method | Ready In | Notes |
|---|---|---|
| Hot composting | 4-8 weeks | Fastest method. Requires regular turning and moisture management. |
| Compost tumbler | 4-8 weeks | Similar speed to hot composting. Heat retention varies by model. |
| Worm bin | 2-3 months | Castings are ready when original bedding and food are fully unrecognizable. |
| Bokashi | 4-6 weeks fermentation + 2-4 weeks in soil | Fermentation finishes in the bucket, but the output must be buried to complete breakdown. |
| Electric composter | 4-8 hour cycle + 2-4 weeks in soil | Machine signals “done” but output is pre-compost. Needs soil contact to finish. |
| Cold composting | 6-12 months | Passive, no turning required. The slowest method by far. |
Bokashi and electric composters share something most users don’t expect: both produce material that requires a second stage. The bokashi bucket finishes fermentation in 4 to 6 weeks, but the output still needs to be buried in soil or mixed into a pile for another 2 to 4 weeks. Electric composters work the same way. What comes out of the machine is dehydrated and partially processed, not composted. Burying it for a few weeks finishes the job.
Worm bin harvests follow a different readiness pattern. You’re looking for castings that are uniformly dark with no visible food or bedding. Partial harvests (pulling finished sections while the rest of the bin keeps running) work well here because worms naturally migrate toward fresh food, leaving clean castings behind.
What If Your Compost Isn’t Quite Ready?
Three options if your pile passed some tests but not all. None involve throwing it out.
Cure it. Stop adding new material, cover the pile, and wait 2 to 4 more weeks. Then run the germination test again. Most batches that fail on the first attempt pass on the second.
Use it as mulch. Spread it 2 to 3 inches thick on the surface of soil without mixing it in. Surface application avoids direct root contact. Breakdown continues in place, and established trees, shrubs, and perennials tolerate it well.
Add it to an active compost pile. Partially finished compost accelerates a new batch. The microbial population already present jump-starts decomposition in fresh material. Nothing is wasted.
Why this matters: when immature compost is mixed into soil, microbes consume nitrogen to finish breaking it down. That’s the same nitrogen your plants need for leaf growth and root development. The result is nitrogen tie-up, and it’s the direct cause of the stunted, yellowing seedlings that show up two weeks after applying compost that looked ready but wasn’t. An extra 2 to 4 weeks of curing avoids the problem entirely.
FAQ
How do I know when my compost is ready to use?
Run five checks: it smells earthy (not like ammonia or sulfur), it’s dark brown to black, original materials are unrecognizable, the pile no longer heats after turning, and a germination test passes. For compost going near seeds or young transplants, the germination test is the most reliable. Plant 10 radish seeds in a 50/50 mix of compost and potting soil. Seven or more sprouting after 10 days means the compost is ready.
What does finished compost look like?
Dark brown to black, crumbly, and uniform in texture. You should not be able to identify any of the original inputs (food scraps, leaves, straw, cardboard). The material looks and feels like rich garden soil. If you can still see recognizable fragments, the compost needs more time.
What does finished compost smell like?
Earthy, like a forest floor or damp soil after rain. Ammonia smell means excess nitrogen and incomplete decomposition. A sulfur or rotten-egg smell signals anaerobic conditions, usually from compaction or excess moisture. Both smells mean the batch is not finished.
How long does it take for compost to be ready?
It depends on the method. Hot composting and compost tumblers: 4 to 8 weeks. Worm bins: 2 to 3 months. Bokashi: 4 to 6 weeks of fermentation plus 2 to 4 weeks buried in soil. Electric composters: hours of processing plus 2 to 4 weeks in soil. Cold composting: 6 to 12 months. The fastest methods require active management; the slowest are hands-off.
Can I use compost before it’s fully finished?
Yes, but only as surface mulch. Spread it on top of soil around established plants without mixing it in. Do not use immature compost in beds where you’re sowing seeds or transplanting seedlings. Phytotoxins in unfinished compost suppress germination and root growth.
What is the germination test for compost maturity?
Mix equal parts compost and potting soil in a small container. Plant 10 radish seeds about half an inch deep. Keep moist and at room temperature for 10 days. If 7 or more seeds germinate, the compost is mature and safe for planting beds. Fewer than 7 means phytotoxins are still present and the batch needs more time.
How do I know when worm castings are ready to harvest?
Castings are ready when the material is uniformly dark, crumbly, and contains no recognizable food scraps or bedding. The simplest harvest method: push all contents to one side of the bin, add fresh bedding and food to the empty side, and wait 2 to 3 weeks. Worms migrate toward the new food source, leaving clean castings on the other side for removal.
You might also like
Free for beginners
Get the Free Composting Starter Kit
5-day email course + printable guide + our top product picks. Everything you need to start composting confidently.
Get Free AccessNo spam. Unsubscribe any time.